How To Install Nagios On CentOS 6
Step 1 - Install Packages on Monitoring Server
rpm -Uvh http://dl.fedoraproject.org/pub/epel/6/x86_64/epel-release-6-8.noarch.rpm
rpm -Uvh http://rpms.famillecollet.com/enterprise/remi-release-6.rpm
yum -y install nagios nagios-plugins-all nagios-plugins-nrpe nrpe php httpd
chkconfig httpd on && chkconfig nagios on
service httpd start && service nagios start
We should also enable SWAP memory on this droplet, at least 2GB:
dd if=/dev/zero of=/swap bs=1024 count=2097152
mkswap /swap && chown root. /swap && chmod 0600 /swap && swapon /swap
echo /swap swap swap defaults 0 0 >> /etc/fstab
echo vm.swappiness = 0 >> /etc/sysctl.conf && sysctl -p
Step 2 - Set Password Protection
Set Nagios Admin Panel Password:
htpasswd -c /etc/nagios/passwd nagiosadmin

Make sure to keep this username as "nagiosadmin" - otherwise you would have to change /etc/nagios/cgi.cfg and redefine authorized admin.
Now you can navigate over to your droplet's IP address http://IP/nagios and login.
You will be prompted for password you set in Step 2:

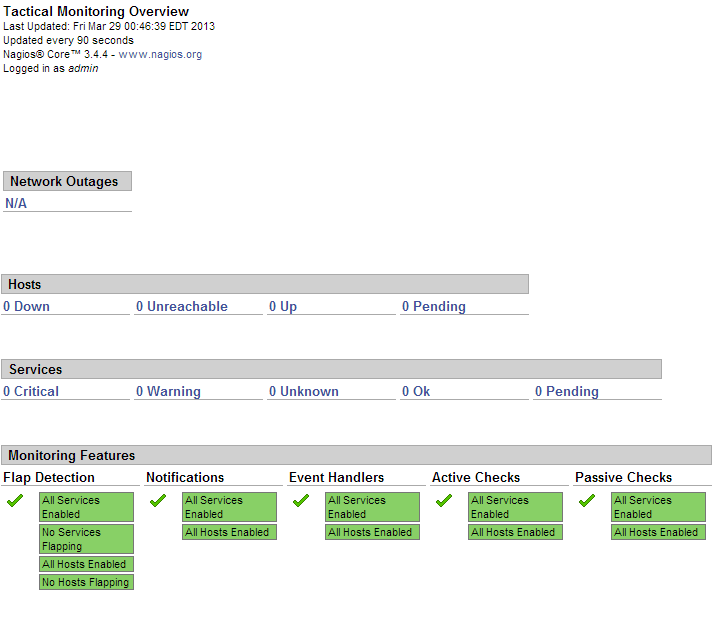
This is what the Nagios admin panel looks like:

Since this is a fresh installation, we don't have any hosts currently being monitored.
Now we should add our hosts that will be monitored by Nagios. For example, we will use cloudmail.tk (198.211.107.218) and emailocean.tk (198.211.112.99).
From public ports, we can monitor ping, any open ports such as webserver, e-mail server, etc.
For internal services that are listening on localhost, such as MySQL, memcached, system services, we will need to use NRPE.
Step 4 - Install NRPE on Clients
rpm -Uvh http://dl.fedoraproject.org/pub/epel/6/x86_64/epel-release-6-8.noarch.rpm
rpm -Uvh http://rpms.famillecollet.com/enterprise/remi-release-6.rpm
yum -y install nagios nagios-plugins-all nrpe
chkconfig nrpe on
This next step is where you get to specify any manual commands that Monitoring server can send via NRPE to these client hosts.
Make sure to change allowed_hosts to your own values.
Edit /etc/nagios/nrpe.cfg
log_facility=daemon
pid_file=/var/run/nrpe/nrpe.pid
server_port=5666
nrpe_user=nrpe
nrpe_group=nrpe
allowed_hosts=198.211.117.251
dont_blame_nrpe=1
debug=0
command_timeout=60
connection_timeout=300
include_dir=/etc/nrpe.d/
command[check_users]=/usr/lib64/nagios/plugins/check_users -w 5 -c 10
command[check_load]=/usr/lib64/nagios/plugins/check_load -w 15,10,5 -c 30,25,20
command[check_disk]=/usr/lib64/nagios/plugins/check_disk -w 20% -c 10% -p /dev/vda
command[check_zombie_procs]=/usr/lib64/nagios/plugins/check_procs -w 5 -c 10 -s Z
command[check_total_procs]=/usr/lib64/nagios/plugins/check_procs -w 150 -c 200
command[check_procs]=/usr/lib64/nagios/plugins/check_procs -w $ARG1$ -c $ARG2$ -s $ARG3$
Note:
In check_disk above, the partition being checked is /dev/vda - make sure your droplet has the same partition by running df -h / You can also modify when to trigger warnings or critical alerts - above configuration sets Warning at 20% free disk space remaining, and Critical alert at 10% free space remaining.
We should also setup firewall rules to allow connections from our Monitoring server to those clients and drop everyone else:
iptables -N NRPE
iptables -I INPUT -s 0/0 -p tcp --dport 5666 -j NRPE
iptables -I NRPE -s 198.211.117.251 -j ACCEPT
iptables -A NRPE -s 0/0 -j DROP
/etc/init.d/iptables save
Now you can start NRPE on all of your client hosts:
service nrpe start
Step 5 - Add Server Configurations on Monitoring Server
Back on our Monitoring server, we will have to create config files for each of our client servers:
echo "cfg_dir=/etc/nagios/servers" >> /etc/nagios/nagios.cfg
cd /etc/nagios/servers
touch cloudmail.tk.cfg
touch emailocean.tk.cfg
Edit each client's configuration file and define which services you would like monitored.
nano /etc/nagios/servers/cloudmail.tk.cfg
Add the following lines:
define host {
        use                     linux-server
        host_name               cloudmail.tk
        alias                   cloudmail.tk
        address                 198.211.107.218
        }

define service {
        use                             generic-service
        host_name                       cloudmail.tk
        service_description             PING
        check_command                   check_ping!100.0,20%!500.0,60%
        }

define service {
        use                             generic-service
        host_name                       cloudmail.tk
        service_description             SSH
        check_command                   check_ssh
        notifications_enabled           0
        }

define service {
        use                             generic-service
        host_name                       cloudmail.tk
        service_description             Current Load
        check_command                   check_local_load!5.0,4.0,3.0!10.0,6.0,4.0
        }
You can add more services to be monitored as desired. Same configuration should be added for second client, emailocean.tk, with different IP address and host_name:
This is a snippet of /etc/nagios/servers/emailocean.tk.cfg:
define host {
        use                     linux-server
        host_name               emailocean.tk
        alias                   emailocean.tk
        address                 198.211.112.99
        }

...
You can add additional clients to be monitored as /etc/nagios/servers/AnotherHostName.cfg
Finally, after you are done adding all the client configurations, you should set folder permissions correctly and restart Nagios on your Monitoring Server:
chown -R nagios. /etc/nagios
service nagios restart
Step 6 - Monitor Hosts in Nagios
Navigate over to your Monitoring Server's IP address http://IP/nagios and enter password set in Step 2.
Now you should be able to see all the hosts and services:
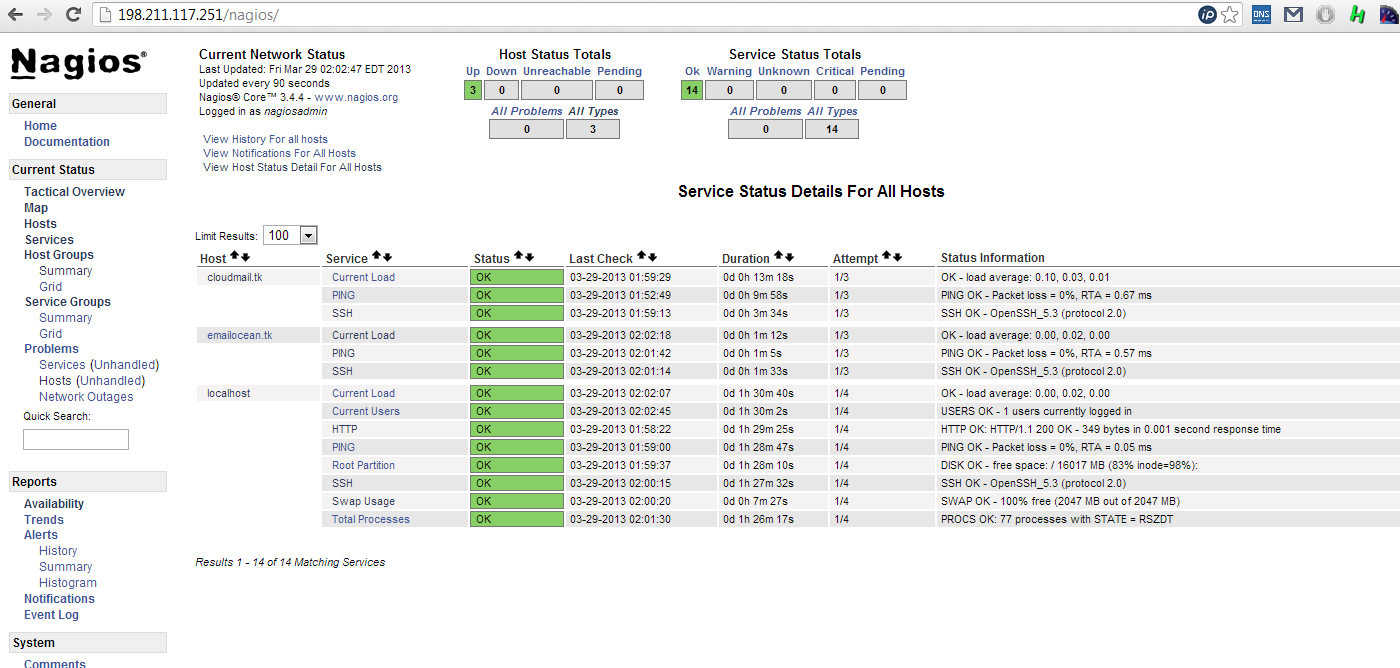
And you are all done!
nagios.sh
---
rpm -Uvh http://dl.fedoraproject.org/pub/epel/6/x86_64/epel-release-6-8.noarch.rpmrpm -Uvh http://rpms.famillecollet.com/enterprise/remi-release-6.rpm
yum -y install nagios
yum -y install nagios-plugins-all
yum -y install nagios-plugins-nrpe
yum -y install nrpe
yum -y install php
yum -y install httpd
chkconfig httpd on && chkconfig nagios on
service httpd start && service nagios start
creating password for nagios admin:
htpasswd -c /etc/nagios/passwd nagiosadmin
nrpe.sh
---
rpm -Uvh http://dl.fedoraproject.org/pub/epel/6/x86_64/epel-release-6-8.noarch.rpm
rpm -Uvh http://rpms.famillecollet.com/enterprise/remi-release-6.rpm
yum -y install nagios
yum -y install nagios-plugins-all
yum -y install nrpe
chkconfig nrpe on
-----------
serverconfig.sh
---------------------
echo "cfg_dir=/etc/nagios/servers" >> /etc/nagios/nagios.cfg
cd /etc/nagios/servers
touch cloudmail.tk.cfg
touch emailocean.tk.cfg
nano /etc/nagios/servers/cloudmail.tk.cfg
No comments:
Post a Comment